Stat counter

September 28, 2011

Millions of peaches...


Come and check out our new blog!

http://theecohousewives.wordpress.com


OK, not millions, but all the same-jars and jars of beautiful golden peaches!

Peaches scored and ready to be peeled!
My friend Lisa was ready to pop with her third baby, and she called me up in a nesting panic to help her can 2 boxes of fresh peaches! So I packed up my canning supplies and headed to her place!


Peeled and shiny!
So, I had canned peaches with my Mom before, so I knew the general plan, but I forgot, and failed to read in my canning book, that peaches take half an hour PER BATCH! So we started at about 5:30, and didn't finish them until 1:30 AM!!! A big thanks to Lisa's hubby who went on a search for a second canning pot for us to help speed things along.


It is 9:30 at night and the first batch has #l only just gone in...hence my pouty face!

But SEVEN HOURS (gag) of work were well worth it! I am sure you will agree.


Lisa-ready to pop!

And even though the peaches were MY greatest achievement of the week-Lisa's was a beautiful baby boy born 5 days later! CONGRATS MAMA!


August 16, 2011

A Good Neighbour!

"Love your neighbour as yourself." Mark 12:31 

Ok, so after doing a google search to find where this verse is found (my Sunday school teachers would be appalled), I have settled in for a speedy-quick lunch break blog post.

Super speedy! Because all this blog post is, is a big shout out to my neighbour Gary! He is the kind of neighbour that makes putting this verse into practice easy! Easy-peasy! 

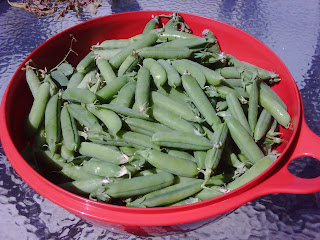
Bowl o' peas!

I got a knock on my door letting me know that he had more peas than he could handle, and I was free to clear them off his vines! WHEEEE!!! I have planted peas this year as well, but let's just clarify that Gary's garden is something I aspire to. My pea vine might provide a single meal's worth of peas...but I think what I got off of Gary's vines will last me through the winter!


On a side note-I have found my camera! So these second rate cell phone pictures will come to an end. YAY!
Well stocked freezer!

August 14, 2011

It's That Time of Year Again!

Ah summer, the time of year when it is so scorching hot outside, the last thing you want to do is have your stove on all day...but that is what canning is about! Unfortunately, most of the lovely fruits and veggies I can are in season in SUMMER!
But is always worth it! So this summer, we got started with berries and baby cukes from a local U-Pick (the Jungle Farm) that I have used before, and then got to work! A big thanks to my lovely sis-in-law, Lisette. It made a big job much more manageable! And another big thanks to my neighbour Kayla, who came out and helped me pick! I am surrounded by amazing people!

Getting everything prepped!


I love home canning for so many reasons. I love to control what is going into my jars of deliciousness, and I love how it tastes! Not to mention I am a bit of a "Martha" and enjoy homemaking activities in general! Cooking, baking, sewing, bring it on!

So back to the canned goods:


Pickles all ready to be processed!

We are all garlic lovers in my house, so we threw in a couple extra cloves per jar-I can't wait to see how they taste! The catch with pickles is the six week wait before you can dig in. The flavours need time to make friends, or else you are just eating cukes coated in vinegar.

I also used a new pickling spice mix this year. Usually I just use the Bernardin pickle mix, which is fine, but this year I had the chance to visit Silk Road Spice Merchant in Calgary, and their pickling spice looked amazing! So we will see, come October, what difference a high quality spice mix makes! I am also considering their dried hot pepper varieties to spice up upcoming batches of salsa!

We also made a batch of raspberry jam and a batch of strawberry-rhubarb jam. I have rhubarb coming out of my ears in my backyard, so I am going to be canning it in some new ways this year!


Beauties!
I have a long list of what I would like to can this year: tomatoes, homemade ketchup, pasta sauce, salsa, rhubarb marmalade, red pepper jelly...now just to find the time to do it all!


A BIG thanks to Lisette for cleaning up my kitchen post-production!

June 9, 2011

Cutting back the carbs!

So don't get me wrong, I think every healthy lifestyle contains a healthy dose of whole grains and carbohydrates. But if you, like me, dream of bread, pasta, cookies and cupcakes; a little moderation may be in order.

So when slogging through days of tuna salad and chicken breast with broccoli gets a tad  extremely boring, give in to your dreams of burgers and pasta with my knockoffs. And just like your fake Coach purse, they may not be the same as the real deal, but they come pretty close!

My personal favourite is the pasta that grows in your garden - spaghetti squash. It is easy to cook, just slice, scoop and bake! Then the filling scrapes out into dreamy spaghetti strands, just begging to be topped with your favourite pasta sauce!


My other recent discovery is to swap out your burger bun with a portobello mushroom sliced in half. It looks just like a bun, has a great texture and is much more satisfying than 2 soggy lettuce leaves!

Enjoy!!!

May 8, 2011

Starting Seeds

Winter seems to have finally lost its iron grip on my part of the world, and things are starting to poke out of the ground and grow. Although we are getting regular frost in the mornings, it is the perfect time to start seeds indoors!

Starting your own seeds gives you more control over how these seeds are grown and fertilized, and it is also much cheaper than buying packs of plants already started by the nursery.

Little packs of promise!


I have to admit that I love going to the outdoor store and poring over the racks of seeds, deciding which to choose for my garden this year. Some of those seeds have to wait and go directly in the ground in a few weeks, but I have started others inside in a small plastic "greenhouse" seed tray.


Just planted and ready to start growing!


I am really enjoying watching the zucchini and spaghetti squash sprouts push themselves up through the dirt and begin to grow-and now I can't wait to get them into the garden.
Inch by Inch, Row by Row

So if you live where it is still too chilly to plant things outdoors-what are you waiting for? Start them up inside!

March 21, 2011

Earth Hour!

So this post is a pretty quick one- I am reminding everyone that this Saturday (Saturday, March 26th), at 8:30 PM local time, it is Earth Hour! For those of you that aren't aware of what Earth Hour is all about, here are some quick facts:
  • Earth Hour started in 2007 in Sydney Australia
  • In 2010, 128 countries and territories took part in Earth Hour
  • Global landmarks such as the Sydney Harbour Bridge, CN Tower in Toronto, Golden Gate Bridge in San Francisco, and Rome’s Colosseum have all turned off the lights for Earth Hour
So how can you take part? It's pretty easy-at 8:30 PM, turn off the lights for a full hour! For some extra energy savings, turn off all of the electronics in your home.
Imagine the kind of difference we could make if we ALL turned off our lights for an hour!

And it does not have to stop on Saturday. Start small by being aware of your lighting at all times. Make sure the bulbs you use are energy-efficient (CFLs, etc.) and turn off the lights in rooms you are not using.

Make it fun! This is the perfect time for a candlelit supper with your spouse, or telling a story in bed by flashlight!

For more info, head to http://www.earthhour.org/

March 13, 2011

My Global Community

Blogger has a great feature for bloggers called "Stats." This tracks how many people view my site, what pages are the most popular-and my favourite part-the audience. I get so excited seeing that people from all over the world view my blog-Germany, Turkey, USA, Kuwait, Thailand, Uruguay, India, and of course my country, Canada..and it goes on and on!!! Here I am in my tiny section of this huge global community, writing about my efforts to change my life and my environment through healthy, natural living, and people on the other side of the world read about it!
I can only hope that you find my blog helpful and interesting...but it got me to thinking-what about you? How do you preserve your food in Thailand? What natural housecleaning methods do you use in Germany? What difficulties do you face growing your own food in India? Do you have a blog of your own that might give me insight on my personal eco-friendly journey?
So share your story-leave me a comment or a link to show me more about your world! Or become a follower to stay updated with mine!

March 4, 2011

Getting Ready for Spring

Okay, it is freezing cold outside and there is still snow on the ground, but that doesn't mean you can't be gardening! Ok...so you can't actually garden, but now is the perfect time to plan! If you have an already established garden, this might be easier, but if you are just getting started, use this horrible weather as an opportunity to figure everything out.

So right now, here are some of the things I am doing to prepare for the spring:

*Map out my garden's layout
This year I am planning to add new beds (who needs a lawn?), and edge my beds with cedar or untreated lumber to give my garden more definition.

Just sketch something out by hand, or download a program-there are various online planners. My layout was simply made on Microsoft Word using shapes and text boxes...and I can update it as I think of other planting ideas. For instance, that expanse of available deck space...

If you live in a condo or a small space, start planning what kind of planters you will need for the types of veggies you will grow. Deep planters for carrots and potatoes, long thin ones on your balcony railing for herbs, a salad table for lettuce...any size can have your own veggies!


*Choose my plants
This is based on what worked well last year (zuchinni) and what didn't (brocolli-seriously, I got one floret!)
What new veggies do I want to try (quinoa)? This will also help me to realize what needs to be started indoors for optimum growth (the spaghetti squash grown direct from seed last year were tiny).
Do I want to put in new flowers? Annuals or perennials? And what grows best in my area?

*Make a timeline
What needs to be started indoors? When? What seeds can go right in the ground? When? What I am buying at a pre-started plant? When are the last frost dates for my area (many Canadians wait until after the May long weekend).

*Make a shopping list
Buy seeds now-there will be more to choose from, and then you can use the guidelines on the back of the package to determine when they should be started and when they can go outside. Decide which plants you will not be starting from seed.
Start planning for what else you will need: border materials, organic fertilizer, mulch, trellises, tools, cute rubber boots decorated with flowers or ladybugs...sorry-daydreaming again!

*Get excited!
Look forward to getting out there, getting your hands dirty, and watching your veggies and flowers grow! Gardening is one of the most relaxing and rewarding activities I do. Every spring brings the opportunity to try something new and reinvent your space-that is worth getting excited over!

Good luck on all of you planning-it will be fun now, and will save you many a headache come spring...HAPPY PLANNING!


Some great resources:

Canadian Wildlife foundation http://www.cwf-fcf.org/en/what-we-do/habitat/get-gardening/getting-started/
This site is great as it has lots of gardening advice, but also shows how to make your garden creature-friendly

Canadian Gardening http://www.canadiangardening.com/design-and-decor
Gardening from a Canadian perspective

Martha Stewart http://www.marthastewart.com/
Because I love her and she is amazing! There is also instructions on building your own salad table on her site.

February 25, 2011

A Bowl of Warmth - Chili and Cornbread


Come and check out our new blog!

http://theecohousewives.wordpress.com


It has been way too cold the last while here (-32 C on my drive home last night!) and so I felt like a bowl of one of my favourite wintertime comfort foods-chili. And you can't have chili without cornbread, so one thing led to another...which led to a delicious supper!

I love this chili because it isn't too heavy on the meat and beans, so it is filling without being too heavy. And I spiced it up this time with some habenero chili sauce the in-laws brought back from vacation.


1 lb extra lean ground beef, browned

Then add and saute:
1 chopped green pepper
1/2 onion, finely chopped
5-6 button mushrooms, sliced
2 cloves of garlic, pressed


Once softened add:

Large can of diced tomatoes
1 can mixed beans
1/2 cup frozen or fresh corn kernels
1 1/2 Tbl chili powder
Salt to taste
Habenero chili sauce to taste


For the cornbread, I took one of my favourite cornbread recipes and switched a few things up to make it my own. I love this cornbread because you add corn kernels, which gives it a delicious texture.

1/3 cup unsalted butter
2 tsp olive oil
1 cup corn kernels, fresh or frozen
1 cup all-purpose flour
1/4 cup honey
2 tsp baking powder
1/2 tsp sea salt
1 cup yellow cornmeal
1 cup milk
1 large egg, lightly beaten

Preheat the oven to 425 F. Grease an 8-inch square baking pan and line with parchment paper. Drizzle kernels with olive oil in a saute pan. Cook until corn has softened and some of the kernels have turned light golden brown. Set aside.
Whisk together flour, baking powder and salt. stir in cornmeal. Add butter, cut in until mixture resembles coarse crumbs. Add honey, milk, eggs, and corn kernels. stir to combine.
Pour into prepared pan, and bake for 18-20 minutes (until edges turn golden brown and a toothpick inserted in the middle comes out clean).
Best served warm, same day.

Bob's Red Mill products are great! And their cornmeal has a great flavour and texture!

February 21, 2011

Get Me to the Greek -Yogurt That Is!


Come and check out our new blog!

http://theecohousewives.wordpress.com


So, by now you might have tried making your own homemade yogurt. I hope you and your family have enjoyed it!

You probably noticed that your yogurt can have a tendency to separate, and the whey will float on top. That's because your yogurt doesn't have any additives to keep this from happening. Just stir it back into the yogurt - OR - strain it off and make some deliciously thick and creamy Greek yogurt!

I know this looks nasty-but it is perfectly normal!

Greek yogurt also takes some of that "sour" flavour out of your homemade yogurt. It is also better for cooking (tzatziki, yogurt-based curries, etc.), as it won't "separate out" the way regular yogurt will. It also makes a much creamier frozen yogurt.

To make your Greek yogurt, place a fine mesh sieve over a large bowl. Line that sieve with coffee filters. Pour regular yogurt into the sieve.

All set up to strain the yogurt!

Pop the bowl in the yogurt for 3 hours or overnight, and the next day, the whey will have drained through to the bowl, and you will be left with Greek yogurt.

If you are in a rush, pour your yogurt into a clean, white tea towel, and squeeze out the excess whey before placing the tea towel into the sieve for an hour or two. Keep in mind-this is messier than the coffee filters!


Now for all you calorie counters out there, remember that your Greek yogurt is a concentrated version of your regular yogurt! But I find find Greek yogurt to be more filling, so it's a decent trade-off. 

Enjoy your homemade Greek yogurt!

January 25, 2011

Nature's Little Overachiever: Stevia


Come and check out our new blog!

http://theecohousewives.wordpress.com


Alright, if you know me, you know how I feel about fake sugars (aspartame, sucralose, you name it). They are chemically produced or altered, and they give me migraines (never a good sign)!

But I have a huge sweet tooth, accompanied by a desire to lose weight. And so begins my love affair with Stevia.

Stevia is a South American herb that has been used as a sweetener for hundreds of years. The leaves of this small, green Stevia rebaudiana plant can be 30 times sweeter than sugar. It used to be found mostly in health food stores, but now I can find it in packets at my local grocery store. It is available in a powdered or tincture (liquid) form. I have been told the liquid form can have a slight licorice flavour, but I use the powdered form.


Stevia has many excellent properties. The body does not metabolize the sweet glycosides from the stevia leaf or any of its processed forms - so there is no caloric intake. Stevia doesn't adversely affect blood glucose levels and may be used freely by diabetics.

Photo by Ethel Aardvark

I used stevia in my homemade frozen yogurt-and it worked great. A few little packets sweetened as much as a cup of sugar!
It can't be substituted in everything, as its texture is different from sugar. So meringues, icings, most cookies; anything where sugar's ability to stiffen and cream with butter is required-then I recommend using the real deal-sugar (unrefined when possible). Try it out in your coffee, on your (homemade) yogurt, anywhere you might be using aspartame or Splenda...

As the Canadian and USA governments slowly approve Stevia, you can now find it in place of artificial sweeteners in some mainstream brands. SoBe has a few of their drinks made with stevia, and the new 10Cal Vitamin water by Aquafina as has it. You'll often see the brand Purevia or Truvia on the bottle as the stevia brand.

Of course, with any new item your are introducing into your diet, do your research on stevia. The Japanese, Chinese, and Koreans have used stevia in foods and soft drinks for many years as an alternative to the artificial sweeteners. The wide use of stevia has been without any apparent harmful effects.

In 2006, the World Health Organization evaluated stevia and found no evidence that its sweet compounds, stevioside and rebaudioside A, have any carcinogenic activity.  The most recent studies seem to suggest stevia is safe, but there is a lack of human research to determine long-term risks.

In my opinion, anything natural has got to be a better and healthier option than artificial, chemical sweeteners!

Thanks to http://www.stevia.com/, http://www.vegetarian-nutrition.info/herbs/stevia.php and Wikipedia for some of the background info! Go to http://www.stevia.com/ for recipes, and to order some it if you find (GASP!) that your local grocery store doesn't have it.

January 16, 2011

Make Your Own: YOGURT!!!


Come and check out our new blog!

http://theecohousewives.wordpress.com


Many people are surprised when I tell them that I make my own yogurt. But in reality it is cheaper than you think, and much easier than you think!

What I love about making my own yogurt is that I can control what goes into it. I can use the type of sugar I want. or leave sugar out completely. I can use fresh, organic fruit to flavour it.

To top it off, homemade yogurt is full of healthy bacteria!

Also, rather than using a thickener, I use a higher fat yogurt. Another option is to strain the yogurt (more on that later) to make a thicker, creamier Greek-style yogurt.

Some people use electric yogurt machines, but I choose to use the (much cheaper) Yogotherm yogurt maker. Really, all it does it insulate the yogurt as it ferments.

To make your first batch, you can use a yogurt starter, such as Yogourmet, shown below. After that, you can use your existing yogurt to start your next batch (much cheaper)!

The basics are as follows*:

1. Bring 1 litre of milk to it's boiling point.
2. Allow to cool to 25 Celsius
3. Mix starter with a small amount of cooled milk until starter dissolves.
4. Mix that small amount of milk into the rest.
5. Pour into Yogotherm and leave at room temp for 12-18 hours.
6. Put finished yogurt in the fridge.

*Just in case, always follow the recipe on your starter, in case it differs from mine.

But see? It is so simple! And from this you can have your morning yogurt, yogurt smoothies, frozen yogurt...and the possibilities go on!